


📅 Updated: June 7, 2026 (Originally published: January 16, 2026)
Running a Magento 2 store with the built-in Full Page Cache (FPC) works for smaller shops, but Varnish Cache delivers dramatically faster page loads that directly impact your conversion rates. The challenge? Most tutorials require taking your store offline during the switch.
This guide shows you how to enable Varnish Cache on Magento 2 without downtime—keeping your store live while you configure the world’s most powerful HTTP accelerator.
Why Switch from Built-in Cache to Varnish?
Magento 2’s built-in cache still executes PHP code for every request, even cached ones. Varnish serves cached pages directly from memory, bypassing PHP entirely. The result:
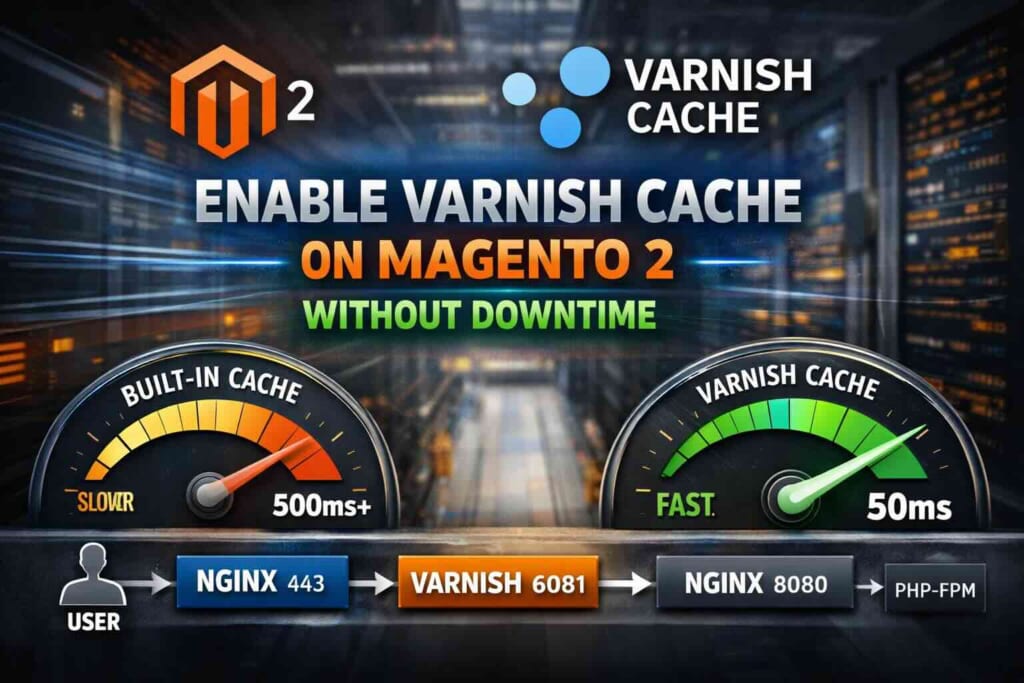
- 10x faster response times for cached pages (sub-50ms vs 500ms+)
- Higher server capacity — handle 10x more concurrent visitors
- Better Core Web Vitals scores, improving SEO rankings
- Lower server costs — same traffic, smaller infrastructure
Adobe officially recommends Varnish as the production cache for Magento 2, supporting versions 6.x and 7.x.
Prerequisites
Before you begin, ensure you have:
- Magento 2.4.x installed and working
- SSH access to your server
- NGINX as your web server (this guide uses the NGINX sandwich architecture)
- Root or sudo access for installing packages
Step 1: Install Varnish Cache
Install Varnish 7.x (recommended) or 6.0 LTS on your server. For RHEL/CentOS/AlmaLinux:
sudo dnf install varnish
For Ubuntu/Debian:
sudo apt install varnish
For detailed installation instructions including repository setup, see our complete guide: Install Varnish Cache for NGINX.
Step 2: Plan Your Port Architecture
The key to zero-downtime migration is running Varnish in parallel with your existing setup before switching traffic.
Recommended architecture (NGINX Sandwich):
Client → NGINX (443/SSL) → Varnish (6081) → NGINX (8080) → PHP-FPM
This setup:
– Terminates SSL at the front NGINX
– Lets Varnish handle caching on port 6081
– Backend NGINX serves dynamic requests on port 8080
Step 3: Configure NGINX Backend
Modify your NGINX server block to listen on port 8080 for backend requests:
server {
    listen 8080;
    server_name example.com localhost;

    # ... rest of your Magento configuration
}
Including localhost in server_name allows Varnish to connect without hardcoding domains in VCL.
Alternatively, use the default_server directive:
server {
    listen 8080 default_server;
    server_name example.com;
}
Test your configuration:
sudo nginx -t && sudo systemctl reload nginx
Step 4: Configure Magento 2 for Varnish
Now tell Magento to use Varnish instead of the built-in cache. This is the critical step that happens without affecting live traffic since Varnish isn’t receiving requests yet.
Enable Varnish as the caching application:
php bin/magento config:set --scope=default --scope-code=0
    system/full_page_cache/caching_application 2
Configure the Varnish connection for cache purging:
php bin/magento setup:config:set --http-cache-hosts=127.0.0.1:6081
Optionally, increase the cache TTL for better performance (2 weeks):
php bin/magento config:set --scope=default --scope-code=0
    system/full_page_cache/ttl 1209600
Clear the Magento cache:
php bin/magento cache:flush
Step 5: Generate and Deploy VCL Configuration
Magento generates a custom VCL (Varnish Configuration Language) file optimized for your store. Export it directly to Varnish:
sudo php bin/magento varnish:vcl:generate --export-version=6
    | sudo tee /etc/varnish/default.vcl > /dev/null
For Varnish 7.x, still use --export-version=6 as the VCL syntax is compatible.
Step 6: Fix the Health Check Path
If your NGINX document root points to Magento’s pub/ directory (the recommended setup), fix the health check URL in the VCL:
sudo sed -i 's|/pub/health_check.php|/health_check.php|g' /etc/varnish/default.vcl
This ensures Varnish can properly check if your backend is healthy.
Step 7: Configure Varnish Service
Edit the Varnish service configuration to set memory allocation and backend port:
sudo systemctl edit varnish
Add:
[Service]
ExecStart=
ExecStart=/usr/sbin/varnishd -a :6081 -f /etc/varnish/default.vcl -s malloc,1G
Adjust the memory (1G) based on your server’s available RAM. For most Magento stores, 1-4GB is sufficient.
Step 8: Start Varnish and Test
Start Varnish without affecting live traffic:
sudo systemctl enable varnish
sudo systemctl start varnish
Test that Varnish is working by making a direct request:
curl -I http://localhost:6081/
You should see response headers including X-Magento-Cache-Debug and Via: ... varnish.
Step 9: Switch Traffic to Varnish (Zero Downtime)
Now for the switch. Update your front-facing NGINX to proxy to Varnish instead of directly to the backend:
upstream varnish_backend {
    server 127.0.0.1:6081;
}

server {
    listen 443 ssl http2;
    server_name example.com;

    # SSL configuration...

    location / {
        proxy_pass http://varnish_backend;
        proxy_set_header Host $host;
        proxy_set_header X-Real-IP $remote_addr;
        proxy_set_header X-Forwarded-For $proxy_add_x_forwarded_for;
        proxy_set_header X-Forwarded-Proto $scheme;
    }
}
Reload NGINX to activate:
sudo nginx -t && sudo systemctl reload nginx
Traffic now flows through Varnish—with zero downtime.
Step 10: Verify Varnish is Working
Check response headers on your live site:
curl -I https://example.com/
Look for:
X-Magento-Cache-Debug: HIT— Page served from Varnish cacheAge: [number]— How long the page has been cachedVia: ... varnish— Confirms Varnish processed the request
First request shows MISS, subsequent requests show HIT.
Troubleshooting Common Issues
Cache Shows MISS on Every Request
- Check if you’re logged in (logged-in users bypass cache)
- Verify cookies aren’t being set unexpectedly
- Ensure the page is cacheable (not checkout, cart, or customer pages)
503 Backend Fetch Failed
- Varnish can’t reach your backend NGINX
- Verify NGINX is listening on the configured port (8080)
- Check firewall rules allow localhost connections
Static Assets Not Loading
- Ensure your CDN or static asset URLs aren’t routed through Varnish
- Or configure Varnish to pass through static file requests
Health Check Failing
- Verify
/health_check.phpexists in your Magento pub directory - Check NGINX logs for 404 errors on health check requests
Performance Tuning Tips
After enabling Varnish, optimize further:
- Increase TTL for static pages — Category and CMS pages can safely cache longer
- Use ESI for dynamic blocks — Varnish supports Edge Side Includes for personalized content
- Monitor hit rate — Use
varnishstatto track cache efficiency - Warm the cache — After deployment, crawl your site to pre-populate cache
Conclusion
You’ve successfully enabled Varnish Cache on Magento 2 without any downtime. Your store now serves cached pages directly from memory, dramatically improving response times and user experience.
Monitor your cache hit rate with varnishstat and watch your Core Web Vitals improve. For high-traffic stores, Varnish isn’t just an optimization—it’s essential infrastructure.
Frequently Asked Questions
Does Magento 2 support Varnish 7?
Yes. Magento 2.4.x officially supports Varnish 6.x and 7.x. The VCL syntax is compatible, so you can use --export-version=6 when generating VCL for Varnish 7.
Can I use Varnish with Redis?
Yes, and you should. Varnish handles full page caching while Redis handles session storage and backend cache (config, layout, block HTML). They complement each other perfectly.
How much RAM does Varnish need?
For most Magento stores, 1-4GB is sufficient. Varnish stores cached pages in RAM, so more memory means more pages cached. Monitor with varnishstat and adjust based on your catalog size.
Will Varnish cache my checkout pages?
No. Magento’s generated VCL automatically excludes checkout, cart, and customer account pages from caching. These pages contain sensitive, personalized data that shouldn’t be cached.
How do I clear the Varnish cache?
From Magento Admin: System → Cache Management → Flush Cache Storage. Or via CLI: php bin/magento cache:flush full_page. Magento automatically purges specific URLs when products or categories change.
Cache rules are right when written; drift makes them wrong. A wrong Cache-Control after a refactor caches private data or breaks invalidation. GetPageSpeed Amplify runs scheduled gixy scans across every host and ties findings to live NGINX runtime metrics. Drop-in compatible with the deprecated nginx-amplify-agent (EOL January 2026).