Monitoring PHP-FPM in Bitnami stacks using NGINX Amplify
by Danila Vershinin, , revisited on

dnf, yum or apt upgrades. It maintains the largest RPM repository of NGINX module packages and Varnish VMODs, with APT packages for Debian and Ubuntu.
Free to install; commercial production use requires a subscription.
nginx-amplify-agent and the F5 cloud endpoint. For a drop-in replacement that keeps your existing agent working with a single config-line change, see GetPageSpeed Amplify: the drop-in NGINX Amplify replacement.If you are a user of Bitnami stack for LEMP or LAMP, you might want to set up PHP-FPM monitoring.
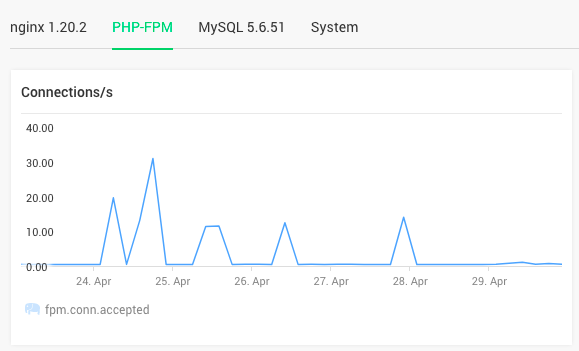
Such monitoring allows you to have a nice overview of your PHP-FPM-based stack, to see how your system behaved and how much it was loaded over periods of time, through a set of graphs.
Despite the name, the free NGINX Amplify service is not only for NGINX users.
Whether you use NGINX with a LEMP stack, or Apache in a LAMP Bitnami stack, you can use the NGINX Amplify service for monitoring your PHP-FPM workloads.
Here are a few quick steps that need to be done to set up such monitoring
Set up the agent
This is pretty straightforward. Once you register at amplify.nginx.com, you are provided with a set of commands to set up the agent on your machine.
E.g. you usually do the following with the proper API_KEY:
cd /tmp
curl -L -O https://github.com/nginxinc/nginx-amplify-agent/raw/master/packages/install.sh
API_KEY='XXXXXXXXXXXXXX' sh ./install.sh
sudo usermod -a -G daemon nginx
service amplify-agent restart
Set up permissions
The Amplify agent is by default set to run with the nginx user. But Bitnami creates PHP-FPM socket files with the daemon user. We can establish readability from one to another by adding nginx user as member of the daemon group:
sudo usermod -a -G daemon nginx
This allowed the Amplify agent to read data from PHP-FPM socket files.
Set up PHP-FPM status
PHP-FPM has the internal status feature, which Amplify agent relies on, in order to gather statistical data.
To enable it for all pools, you may want to run:
nano /opt/bitnami/apps/*/conf/php-fpm/pool.conf
Then paste in:
pm.status_path=/status
ping.path = /ping
ping.response = pong
Restart Amplify agent and PHP-FPM
Now our configuration is almost complete and we want to apply it by restarting PHP-FPM and Amplify agent:
/opt/bitnami/ctlscript.sh restart php-fpm
systemctl restart amplify-agent
Verify
Check PHP-FPM status feature
To check whether you have configured PHP-FPM correctly and PHP-FPM status is working, you may want to install cgi-fcgi program and run:
sudo -u nginx SCRIPT_NAME=/status SCRIPT_FILENAME=/status QUERY_STRING= REQUEST_METHOD=GET cgi-fcgi -bind -connect /opt/bitnami/php/var/run/maynardsfineart.sock
Finally, your NGINX Amplify is set up and you are ready for monitoring and setting up alerts in its dashboard