yum upgrades for production use, this is the repository for you.
Active subscription is required.
📅 Updated: February 18, 2026 (Originally published: August 29, 2018)
Telegram is a very secure and popular instant messaging platform. However, it is subject to censorship in some countries which restrict Internet freedom, namely Russia, China, and Iran.
So welcome to this page, my Russian / Chinese / Iranian friend.
Sure enough, we are here to unblock Telegram Messenger in your country. This can be done by installing special proxy software on a VPS or dedicated server. The software is called MTProxy. For general internet access beyond just Telegram, you might also consider installing a ShadowSocks server. If you’re in China and need access to Google specifically, check out our guide on setting up a Google mirror using NGINX.
MTProxy can be installed easily in CentOS/RHEL 6 / 7 / 8 servers. For our CentOS/RHEL RPM repository, we have built MTProxy package, allowing you to install MTProxy quickly, and thus use Telegram messenger in restricted networks. Here are a few quick steps needed to quickly install and use MTProxy on a CentOS/RHEL instance.
&tldr;
You can simply use our public Telegram proxy. Click here to enable it on a device that has Telegram installed. Otherwise, continue reading to find out how to set up your own MTProxy in no time.
The only requirement is a VPS or a dedicated server with CentOS/RHEL on it. If you don’t have it, here’s a couple of recommendations.
Best VPS for MTProxy (any country)
I highly recommend Linode, which will run you only 5 bucks per month.
Best VPS for MTProxy in Russia
If you or other Telegram users who will use the proxy are in Russia, there is nothing better than FirstVDS:
Да, вы не ослышались! Лучший хостинг для MTProxy серверов это российский хостинг FirstVDS. Проверено – соединение к серверам Telegram с этих серверов не блокируется. Используя сервера FirstVDS для MTProxy вы не только получите стабильное, но и (что немаловажно) быстро соединение в Telegram, так как сервера этого провайдера находятся в России!
1. Install MTProxy
sudo yum -y install https://extras.getpagespeed.com/release-latest.rpm
sudo yum -y install mtproxy
2. Configure MTProxy
The configuration file is /etc/mtproxy/mtproxy.params.
By default, MTProxy is set to run on port 443 (HTTPS).
You can easily run MTProxy on a port other than HTTPS by editing MTPROXY_CLIENT_PORT=443 in the configuration with your desired port.
3. Enable MTProxy service
In CentOS/RHEL 6, run:
sudo chkconfig mtproxy on
sudo service mtproxy start
In CentOS/RHEL 7 and above, run:
sudo systemctl enable --now mtproxy
4. Verify it’s running
systemctl status mtproxy
5. Configure firewall
If you run MTProxy on the standard TLS port 443, run:
sudo firewall-cmd --zone=public --add-service=https --permanent
sudo firewall-cmd --reload
If you run MTProxy on a custom port, e.g. 8443, run:
sudo firewall-cmd --zone=public --add-port=8443/tcp --permanent
sudo firewall-cmd --reload
6. Configure your Telegram Messenger
First, check your proxy’s secret token which was automatically generated upon installing the package. Run cat /etc/mtproxy/secret on the server. This will give you something like this:
MTPROXY_SECRET=08f059c6515c7a163953dcd8df295c97
Simply copy the secret’s value and proceed to configure your Telegram. Add the proxy connection to your Telegram.
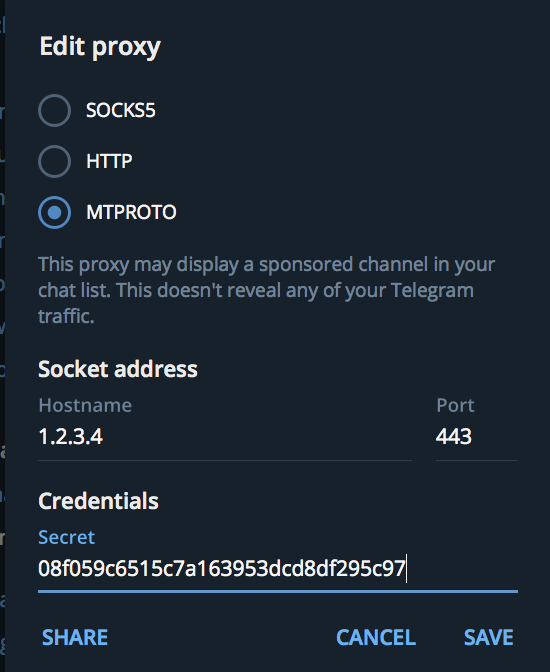
Proxy type: MTPROTO
Socket address: Your server’s IP address
Port: 443
Secret: The secret’s value you copied. You can prepend the value with “dd” in order to get random padding, which is excellent for further hiding use of Telegram to censors.
Promoted channel
Now that you have your MTProxy up and running, you can register it with Telegram in order to promote your channel.
To do this, talk to @MTProxybot and tell it your proxy secret key. The bot will give you a promotion tag.
You will add the tag to your configuration at /etc/mtproxy/mtproxy.params like this:
DAEMON_OPTS="-P xxxxxxxxxxx"
Then restart via systemctl start mtproxy and you’re good to go.
Optional. Socket-based activation
SystemD comes with a nice feature called socket-based activation. This allows for a quicker machine startup because it would only launch the service when it’s actually needed. So first request to Telegram using your proxy, and the service is starting. None? It’s not running.
Our package comes with the socket unit, all you need to do is:
systemctl disable mtproxy
systemctl enable mtproxy.socket
Note that if you’re using a non-standard port, then you need to adjust the socket unit with systemctl edit mtproxy.socket:
[Socket]
ListenStream=
ListenStream=8443
Note that once the service is started by socket, the socket listener quits and MTProxy runs until next reboot. If you want to save some resources (e.g. you know the proxy won’t be used often at night time), you can schedule stopping MTProxy while reactivating the socket listener:
systemctl stop mtproxy
systemctl start mtproxy.socket
Happy messaging!
Going Secure
The newer versions of the package install the configuration file with MTPROXY_USER=mtproxy, allowing the service process to continuously run without root privileges.
The service itself still starts under the root user in order to be able to bind to a privileged port like 443, but calls setuid() to drop privileges.
Subsequently, you may want to further restrict privileges of the service by modifying the SystemD unit file.
Run systemctl edit mtproxy and paste in:
[Service]
User=mtproxy
Then restart the service: systemctl restart mtproxy. In this way, the service will start as mtproxy user and fork – continue running under that user as well, never gaining access to the root privileges at all.
If you intend to run MTProxy on a privileged port (80, 443, etc.) while locking service startup to mtproxy user, you can add:
[Service]
User=mtproxy
AmbientCapabilities=CAP_NET_BIND_SERVICE
So as you can see, SystemD is pretty flexible in a way that we can restrict root access from the service binary completely, even for a case of privileged ports use.
Caveats
MTProxy and rkhunter
The mtproxy binary will likely connect to outgoing port 47018, among others. This activity may be flagged by rkhunter. E.g. you may see this warning generated by it:
Warning: Network TCP port 47018 is being used by
/usr/bin/mtproxy. Possible rootkit: Possible Universal Rootkit (URK) component
Use the ‘lsof -i’ or ‘netstat -an’ command to check this.
If you follow the suggestion and run lsof -i | grep 47018, you can find out the IP address it’s connecting to using that port. E.g. 91.108.4.195, and if you look up this remote IP address via whois 91.108.4.195 | grep netname, you would get netname: Telegram_Messenger_Network.
So this is normal activity by MTProxy establishing connection to remote Telegram servers. You can whitelist this in rkhunter‘s configuration. Create directory /etc/rkhunter.d/ and the file /etc/rkhunter.d/mtproxy.conf inside it with only this content:
PORT_PATH_WHITELIST=/usr/bin/mtproxy:TCP:47018
That’s it. Upon next run, rkhunter will not flag this activity:
Info: Network TCP port 47018 is being used by /usr/bin/mtproxy: the pathname is whitelisted.
Check out our post on sane use of rkhunter.
MTProxy and well…, Telegram!
MTProxy has to regularly fetch the latest Telegram network configuration which consists of information about remote Telegram servers. The Telegram network configuration file is located in /usr/share/mtproxy/proxy-multi.conf.
This network configuration is fetched via a daily cron job, script: /etc/cron.daily/mtproxy. It is automatically installed with the mtproxy package. So you don’t have to do anything on that part.
Note that “stock” MTProxy is unable to gracefully reload its configuration when the new configuration is received. The other issue with stock MTProxy is high CPU use. These are the primary reasons why we build MTProxy package against community fork now.
The MTProxy package allows for graceful configuration reload and modest CPU use.
Fake TLS
MTProxy can be configured to mimic a TLS connection in order to better circumvent censorship.
This requires minor changes on both the server and on the client side.
On the server, adjust your config and put a domain of a website that supports TLS 1.3 encrypted connections, e.g. www.google.com. In /etc/mtproxy/mtproxy.params, specify:
# Any additional switches for the daemon:
DAEMON_OPTS="-D www.google.com"
Now, get the HEX dump of the domain:
echo -n www.google.com | xxd -plain
Restart your MTProxy. Adjust your client-side secret to read:
ee + <MTProxy's secret> + <domain's HEX dump>
Or you can get it the complete client-side secret with this command:
source /etc/mtproxy/secret && echo -n "ee${MTPROXY_SECRET}" && echo -n www.google.com | xxd -plain

Simon
Thanks Danila for easy guidance,
Please tell about MTPROXY_USER=root, is this safe to be root user? how can we change it? and what is your advise .
Thanks.
Danila Vershinin
Hi Simon,
Good point about
MTPROXY_USER=root. Please change it toMTPROXY_USER=nobodyas this will be better in any case.I’ve added notes at the bottom of the post about it. The most secure setup (in terms of MTProxy software being potentially dangerous, which it may be not) would be having
MTPROXY_USER=nobodyin configuration andUser=nobodyfor SystemD unit file, then running MTProxy on an unprivileged port like 8443. Then none of the MTProxy code would be able run as superuser (neither startup, nor continuous running).Sami
Very good , thanks a lot
How I can add Proxy Sponsor TAG into this way ?
Danila Vershinin
What a good question 🙂 This is now possible in the new version of the package. Simply
yum clean allandyum update mtproxy.Then follow the instructions in the updated post (“Promoted channel” section) – get the tag from @MTProxybot and put it to
DAEMON_OPTS="-P xxxxx"in the configuration file.The newer version is also faster because it is built with GCC 7.
Arsalan
I get this error:
● mtproxy.service – MTProxy
Loaded: loaded (/usr/lib/systemd/system/mtproxy.service; enabled; vendor preset: disabled)
Active: failed (Result: start-limit) since Thu 2019-05-23 15:39:52 UTC; 18min ago
Process: 18474 ExecStart=/usr/bin/mtproxy -u $MTPROXY_USER -p $MTPROXY_STATS_PORT -H $MTPROXY_CLIENT_PORT -S $MTPROXY_SECRET -M $MTPROXY_WORKERS –aes-pwd /usr/share/mtproxy/proxy-secret /usr/share/mtproxy/proxy-multi.conf $DAEMON_OPTS (code=exited, status=1/FAILURE)
Main PID: 18474 (code=exited, status=1/FAILURE)
Danila Vershinin
Please try running
journalctl --unit=mtproxyand post the output here.Станислав Васильченко
same problem
Danila Vershinin
Please edit your
/etc/mtproxy/secretand remove the leadingddfrom value. The package generated invalid secret. This is fixed in updated version.Timofey
Hello,
In your implementation of MTProxy there is a “ee” (fake-tls) mode?
Danila Vershinin
Hi Timofey. Yes, there is Fake TLS.