yum upgrades for production use, this is the repository for you.
Active subscription is required.
📅 Updated: July 17, 2026 (Originally published: January 19, 2026)
Want to deploy a Python uWSGI NGINX stack on Rocky Linux? This comprehensive guide shows you exactly how to create a production-ready Python web service using uWSGI as the application server and NGINX as the reverse proxy. Whether you’re building an API endpoint, a microservice, or a specialized backend tool, this battle-tested stack delivers excellent performance and reliability.
The standard approach to running a website typically involves modern PHP frameworks like WordPress, Magento, or Laravel. However, when you need to build something custom, Python becomes an incredibly attractive choice due to its ease of coding and vast ecosystem of libraries.
Python is an extraordinarily powerful programming language with libraries available for virtually every use case imaginable. In fact, complex tasks that would require hundreds of lines in other languages can often be accomplished with just a few lines of Python code. From data processing and machine learning to web scraping and API development, Python’s extensive standard library combined with third-party packages from PyPI makes it the go-to choice for developers worldwide.
In this comprehensive guide, you’ll learn how to create a Python-based web service, serve it efficiently through NGINX using uWSGI, and configure everything for production-grade performance on Rocky Linux 9 or AlmaLinux 10.
Why Choose Python uWSGI NGINX for Web Services?
Before diving into the technical implementation, let’s understand why this stack is an excellent choice for building web services:
The Extensive Python Library Ecosystem
Python’s package index (PyPI) hosts over 400,000 packages. Whether you need to parse XML, connect to databases, perform natural language processing, or interact with cloud services, there’s likely a well-maintained library available. Consequently, this dramatically reduces development time. Moreover, it allows you to focus on your application’s unique logic rather than reinventing the wheel.
Rapid Development with Python
Python’s clean syntax and dynamic typing enable rapid prototyping and iteration. As a result, what might take days in compiled languages can often be accomplished in hours with Python. Therefore, this makes it ideal for building and deploying web services quickly. Additionally, the large community provides excellent documentation and support.
Production-Ready Python uWSGI NGINX Performance
When combined with uWSGI and NGINX, Python web services can handle thousands of concurrent requests efficiently. Furthermore, uWSGI’s pre-forking model and NGINX’s event-driven architecture create a high-performance stack. In addition, this combination rivals solutions built in other languages while maintaining Python’s development simplicity.
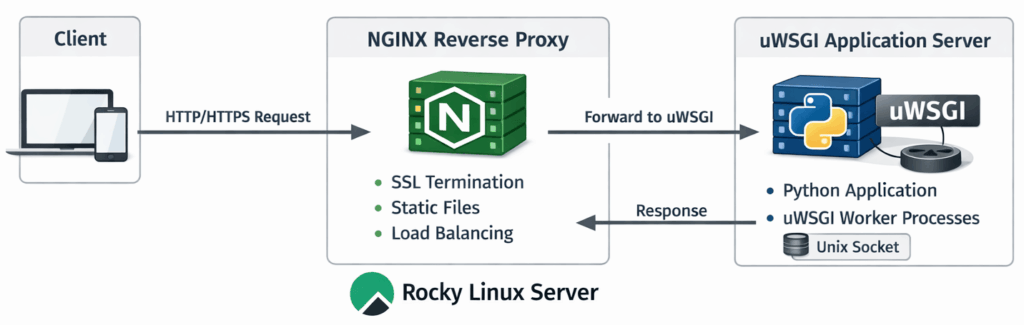
Understanding the Python uWSGI NGINX Architecture
The combination of NGINX and uWSGI creates an optimal environment for serving Python applications. Specifically, each component serves a distinct purpose:
- NGINX serves as the front-end reverse proxy, handling SSL termination, static files, and load balancing
- uWSGI acts as the application server, managing Python worker processes and communicating with NGINX via Unix sockets
- Python executes your application code within the uWSGI environment
This architecture offers several advantages. First, NGINX efficiently manages thousands of simultaneous connections. Second, uWSGI focuses on running Python code. Third, the separation of concerns enhances security. Finally, static content is served directly without involving Python:
- Efficient Connection Handling: NGINX manages thousands of simultaneous connections while uWSGI focuses on running Python code
- Enhanced Security: NGINX acts as a buffer between the internet and your Python application
- Optimized Static Content: NGINX serves static files directly without involving Python
- Robust Process Management: uWSGI handles worker process lifecycle, automatic restarts, and resource limits
Prerequisites for Python uWSGI NGINX Setup
For this guide, we’ll use either Rocky Linux 9 or AlmaLinux 10. Both distributions provide excellent stability and long-term support. As a result, they’re ideal for production web servers.
Installing Required Packages for Python uWSGI NGINX
First, install Python 3, pip, and the necessary development tools:
dnf -y install python3 python3-pip
Next, enable EPEL (Extra Packages for Enterprise Linux) repository. Then, install uWSGI with the Python plugin along with NGINX:
dnf -y install epel-release
dnf -y install uwsgi uwsgi-plugin-python3 nginx
After installation, verify the versions to ensure everything is properly installed:
python3 --version   # Python 3.9.x on Rocky 9, Python 3.12.x on AlmaLinux 10
uwsgi --version     # uWSGI 2.0.x
nginx -v            # nginx/1.20.x or newer
Creating the Python Application for uWSGI
Our example application will provide an API-like service that returns the organization name associated with any IP address, using WHOIS data. Consequently, this demonstrates a practical use case where Python’s rich library ecosystem shines.
Setting Up a Python Virtual Environment
Creating a virtual environment is a Python best practice that isolates your application’s dependencies from system packages. Therefore, we’ll create it in a directory that’s not publicly accessible via the web:
# Create the application directory
mkdir -p /srv/www/example.com
cd /srv/www/example.com

# Create and activate the virtual environment
python3 -m venv get-org
source ./get-org/bin/activate

# Upgrade pip and install the required library
pip install --upgrade pip
pip install ipwhois
The ipwhois library provides comprehensive WHOIS lookup functionality, including ASN (Autonomous System Number) information. As a result, we can use it to identify the organization that owns an IP address.
Creating a Test Script for Your Python Application
Let’s first verify our setup with a simple test script. Create /srv/www/example.com/get-org/test.py:
#!/usr/bin/env python3
from ipwhois import IPWhois

obj = IPWhois('1.1.1.1')
res = obj.lookup_whois()
print(res['asn_description'])
Run the test with the virtual environment activated:
cd /srv/www/example.com
source ./get-org/bin/activate
python3 get-org/test.py
Expected output:
CLOUDFLARENET, US
This confirms that our Python environment is correctly configured. Moreover, it shows the ipwhois library is working properly.
Building the uWSGI-Compatible Python Application
uWSGI requires applications to follow the WSGI (Web Server Gateway Interface) specification. Therefore, your application must provide a callable named application that accepts two arguments: the environment dictionary and a start_response function.
Create /srv/www/example.com/get-org/app.py:
#!/usr/bin/env python3
def application(env, start_response):
    """
    WSGI application that returns the organization name
    for the requesting client's IP address.
    """
    from ipwhois import IPWhois

    # Get the client's real IP address
    remote_addr = env.get('HTTP_X_REAL_IP', env.get('REMOTE_ADDR', ''))

    if not remote_addr:
        start_response('400 Bad Request', [('Content-Type', 'text/plain')])
        return [b'Could not determine client IP address']

    try:
        obj = IPWhois(remote_addr)
        res = obj.lookup_whois()
        org_name = res.get('asn_description', 'Unknown')

        start_response('200 OK', [
            ('Content-Type', 'text/plain; charset=utf-8'),
            ('Cache-Control', 'public, max-age=86400')
        ])
        return [org_name.encode('utf-8')]

    except Exception as e:
        start_response('500 Internal Server Error', [('Content-Type', 'text/plain')])
        return [b'Error looking up IP information']
This application reads the client’s IP address from the X-Real-IP header (set by NGINX) or falls back to REMOTE_ADDR. Additionally, it performs a WHOIS lookup using the ipwhois library. Furthermore, it returns the organization description with appropriate HTTP headers. The code also includes error handling for robustness and sets a 24-hour cache header since IP ownership rarely changes.
Testing uWSGI with Your Python Application
Before configuring NGINX, verify that uWSGI can serve your application:
cd /srv/www/example.com
source ./get-org/bin/activate
uwsgi --plugin python3 -H $(pwd)/get-org --http :9091 --wsgi-file get-org/app.py --master --processes 2
In another terminal, test the service:
curl -s localhost:9091
You should see the organization name for your local IP (likely something like “PRIVATE-ADDRESS-BLOCK” for localhost).
Configuring systemd Service for Python uWSGI
For production use, we need uWSGI to run as a system service that starts automatically and restarts on failure. Consequently, systemd provides the reliability we need.
Creating the systemd Service Unit File
Create /etc/systemd/system/uwsgi-example.com-get-org.service:
[Unit]
Description=Get-Org uWSGI Application
After=network.target

[Service]
User=nginx
Group=nginx
WorkingDirectory=/srv/www/example.com/get-org
ExecStart=/usr/sbin/uwsgi \
    --ini /etc/uwsgi.d/example.com-get-org.ini \
    --socket /run/uwsgi/example.com-get-org.sock
Restart=on-failure
RestartSec=5
KillSignal=SIGQUIT
Type=notify
StandardError=journal
NotifyAccess=all
RuntimeDirectory=uwsgi
RuntimeDirectoryMode=0755

[Install]
WantedBy=multi-user.target
Creating the uWSGI Configuration File
Create the uWSGI configuration directory if it doesn’t exist:
mkdir -p /etc/uwsgi.d
chmod 0755 /etc/uwsgi.d
Subsequently, create /etc/uwsgi.d/example.com-get-org.ini:
[uwsgi]
# Master process management
master = true
enable-threads = true

# Performance tuning
processes = 4
threads = 2
harakiri = 60
max-requests = 5000

# Idle management - exit when not used
cheap = true
idle = 600
die-on-idle = true

# Application settings
base = /srv/www/example.com/get-org
home = %(base)
pythonpath = %(base)
wsgi-file = %(base)/app.py
manage-script-name = true
plugins = python3

# Socket configuration
chmod-socket = 660
vacuum = true
die-on-term = true

# Response headers
add-header = Vary: X-Real-IP
add-header = X-Served-By: uWSGI

# Logging
logto = /var/log/uwsgi/example.com-get-org.log
log-date = true
Then, create the log directory:
mkdir -p /var/log/uwsgi
chown nginx:nginx /var/log/uwsgi
Set proper permissions on the application directory:
chown -R nginx:nginx /srv/www/example.com/get-org
Enabling and Starting the uWSGI Service
Reload systemd and enable the service:
systemctl daemon-reload
systemctl enable --now uwsgi-example.com-get-org.service
systemctl status uwsgi-example.com-get-org.service
Configuring NGINX as Reverse Proxy for Python uWSGI
Now we’ll configure NGINX to proxy requests to our uWSGI application. For more information about NGINX configuration best practices, see our NGINX configuration guide.
Configuring NGINX Upstream for uWSGI
Add the following to your NGINX configuration, typically in /etc/nginx/conf.d/upstream.conf or within the http {} block of /etc/nginx/nginx.conf:
upstream example_com_get_org {
    server unix:/run/uwsgi/example.com-get-org.sock;
    keepalive 8;
}
NGINX Location Block for Python API
Add a location block within your server configuration (e.g., /etc/nginx/conf.d/example.com.conf):
server {
    listen 443 ssl http2;
    server_name example.com www.example.com;

    # SSL configuration (adjust paths as needed)
    ssl_certificate /etc/letsencrypt/live/example.com/fullchain.pem;
    ssl_certificate_key /etc/letsencrypt/live/example.com/privkey.pem;

    # Your existing configuration...

    # Python API endpoint
    location = /api/get-org {
        include uwsgi_params;
        uwsgi_pass example_com_get_org;

        # Pass real client IP to the application
        uwsgi_param HTTP_X_REAL_IP $remote_addr;
        uwsgi_param HTTP_X_FORWARDED_FOR $proxy_add_x_forwarded_for;
        uwsgi_param HTTP_X_FORWARDED_PROTO $scheme;

        # Timeouts
        uwsgi_connect_timeout 10s;
        uwsgi_read_timeout 30s;
        uwsgi_send_timeout 30s;

        # Buffer settings
        uwsgi_buffer_size 4k;
        uwsgi_buffers 8 4k;
    }
}
Testing NGINX Configuration for Python uWSGI
Verify the configuration syntax using our NGINX Config Validator:
nginx -t
If successful, reload NGINX:
systemctl reload nginx
Testing the Complete Python uWSGI NGINX Setup
Test your newly deployed Python web service:
curl -s https://example.com/api/get-org
You should see the organization name for your client IP address.
Performance Optimization for Python uWSGI NGINX
uWSGI Performance Tuning
For high-traffic applications, consider these uWSGI optimizations:
# In your .ini file
processes = 8
threads = 4
listen = 256
max-requests = 10000
max-worker-lifetime = 86400
reload-on-rss = 512
worker-reload-mercy = 60
Here’s what each setting does:
- processes: Number of worker processes (typically 2x CPU cores)
- threads: Threads per process (useful for I/O-bound applications)
- max-requests: Recycle workers after serving this many requests (prevents memory leaks)
- reload-on-rss: Reload worker if memory exceeds this value in MB
NGINX Caching for Python Applications
For endpoints that return cacheable data, enable NGINX microcaching. First, define the cache zone in your http block:
# Define cache zone (in http block)
uwsgi_cache_path /var/cache/nginx/api levels=1:2 keys_zone=api_cache:10m max_size=100m inactive=1h;

# In location block
location = /api/get-org {
    # ... existing configuration ...

    uwsgi_cache api_cache;
    uwsgi_cache_valid 200 1h;
    uwsgi_cache_key $remote_addr;
    add_header X-Cache-Status $upstream_cache_status;
}
Security Best Practices for Python uWSGI NGINX
Rate Limiting with NGINX
Protect your API from abuse with NGINX rate limiting. First, define the limit zone. Then, apply it to your location:
# Define rate limit zone (in http block)
limit_req_zone $binary_remote_addr zone=api_limit:10m rate=10r/s;

# In location block
location = /api/get-org {
    limit_req zone=api_limit burst=20 nodelay;
    # ... rest of configuration ...
}
File Permissions for Python Applications
Ensure proper file permissions:
# Application files should be owned by the service user
chown -R nginx:nginx /srv/www/example.com/get-org
chmod 750 /srv/www/example.com/get-org
chmod 640 /srv/www/example.com/get-org/app.py

# Socket directory
chmod 755 /run/uwsgi
Monitoring Your Python uWSGI NGINX Stack
Enabling uWSGI Stats Server
Enable the uWSGI stats server for monitoring:
# In your .ini file
stats = /run/uwsgi/example.com-get-org-stats.sock
stats-http = true
Access stats via:
curl --unix-socket /run/uwsgi/example.com-get-org-stats.sock http://localhost/
Log Rotation Configuration
Create /etc/logrotate.d/uwsgi:
/var/log/uwsgi/*.log {
    daily
    missingok
    rotate 14
    compress
    delaycompress
    notifempty
    create 0640 nginx nginx
    sharedscripts
    postrotate
        /bin/systemctl reload uwsgi-example.com-get-org.service > /dev/null 2>&1 || true
    endscript
}
Troubleshooting Python uWSGI NGINX Issues
Socket Permission Denied Error
If NGINX reports “permission denied” when connecting to the uWSGI socket, check the ownership:
# Ensure both services use the same user/group
ls -la /run/uwsgi/
# The socket should show nginx:nginx ownership
# Verify socket permissions are 660
502 Bad Gateway Error
This error typically indicates uWSGI isn’t running or the socket path is incorrect. Therefore, check these items:
# Check uWSGI status
systemctl status uwsgi-example.com-get-org

# View recent logs
journalctl -u uwsgi-example.com-get-org -n 50

# Verify socket exists
ls -la /run/uwsgi/
Application Errors in Python
Check the uWSGI application log:
tail -f /var/log/uwsgi/example.com-get-org.log
Conclusion: Python uWSGI NGINX Production Setup
You’ve now learned how to create a production-ready Python web service using the powerful combination of NGINX and uWSGI. In summary, this architecture provides:
- High Performance: uWSGI’s pre-forking model combined with NGINX’s efficient connection handling
- Reliability: systemd integration ensures automatic restarts and proper process management
- Security: NGINX acts as a protective layer between the internet and your Python application
- Flexibility: Easy to extend with additional Python libraries and functionality
Python’s extensive library ecosystem means you can build virtually any type of web service. For instance, you could create simple API endpoints, complex machine learning inference servers, or data processing pipelines. All these options maintain excellent performance characteristics.
The techniques covered in this guide scale from small personal projects to enterprise-level deployments handling millions of requests daily. Combined with proper caching, rate limiting, and monitoring, your Python uWSGI NGINX web services will be ready for production traffic. Finally, remember to monitor your application and adjust the uWSGI worker count based on your actual traffic patterns.
One scan is good; scheduled scans are better. Configurations drift between audits; continuous scanning closes the gap. GetPageSpeed Amplify runs scheduled gixy scans across every host and ties findings to live NGINX runtime metrics. Drop-in compatible with the deprecated nginx-amplify-agent (EOL January 2026).
